What is really new in Adobe IllustratorCC? Shall I move on and get Adobe Creative Cloud, and if yes why?
Adobe Illustrator CC:
- Available only in Creative Cloud.
- Deeply integrated for a modern creative process.
- Is the industry–standard toolset used by professionals worldwide that lets you move work easily between Illustrator and other Adobe creative applications.
- Letting you capture your vision with speed and precision and reliably take those ideas to print, web, interactive, motion, and devices.
Illustrator CC and Creative Cloud:
Adobe Creative Cloud: with all-new Adobe® Illustrator® CC, you always have the latest version. Access to every future release is built right in. Cloud-enabled features like Sync Fonts, Sync Colors, and Sync Settings turn any workspace into your workspace. Adobe Creative Cloud™ is now integrated with Behance™ for real-time inspiration and a seamless way to share your work.
Sync Settings
Work the way you like on any of your computers — Mac or PC. Synchronize your workspace settings to Creative Cloud — including Illustrator preferences, presets, brushes, and libraries — so they go where you go.
Activate Illustrator Preferences Command K (Mac) Control K (Window).
You will see the options for Sync settings. You can also get the Sync Settings from the Illustrator menu bar in MAc and under the Edit menu bar in Windows.
Sign in with your Adobe Creative Cloud ID to activate it.
Sign in with your Adobe Creative Cloud ID to activate it.

Share on Behance
Two ways to launch Behance from Illustrator.
- Click File>Share on Behance.
- Click on the Icon on the lower left corner of the active Illustrator window.
You will need to establish a Behance account using your Adobe ID.
Share files from Adobe Ideas
Create Ideas with Adobe ideas on tablet device or Iphone and simply upload it to the cloud to share with Illustrator. File will stay vector. Create Symbols, Patterns at ease, share and continue working.
WORKING WITH TYPE
Touch Type tool
Design with type in a powerful new way. Characters can now be manipulated like individual objects. Experiment with moving, scaling, and rotating, knowing you can change the font or edit at any time.
Create logos without creating outline. You can now use
multi touch devices as well as a mouse or stylus.
Create logos without creating outline. You can now use
multi touch devices as well as a mouse or stylus.
To manipulate type with the Touch Type tool do the following:
Type a sentence.
Select the Touch Type Tool and click on one of the characters.
You will see a small box with anchor points.
Click and drag a point to scale, rotate and move.
You will see a small box with anchor points.
Click and drag a point to scale, rotate and move.
Change the kerning if needed.
Change the Typeface.
Change the Typeface.

Note: the Touch Type symbols appears now at the top of the
Character panel as well.
Character panel as well.
Area and Point type conversion
Instantly switch between area type and point type.
Text object conversion is now instantaneous so you can design freely in your text layouts. You can work just as easily with imported type, switching formats at any time.
Text object conversion is now instantaneous so you can design freely in your text layouts. You can work just as easily with imported type, switching formats at any time.
Change Area type with one click of a mouse button:
- Select the Point type and double click on the handle to convert to Area type.
- Click again on the Area type to change it back to Point type.

Type utilities and performance:
Faster type performance
Work faster with type, even in your most complicated, type-intensive designs. Text that wraps around objects and type that is set in multiple connected text frames now refreshes quickly when you make a change.
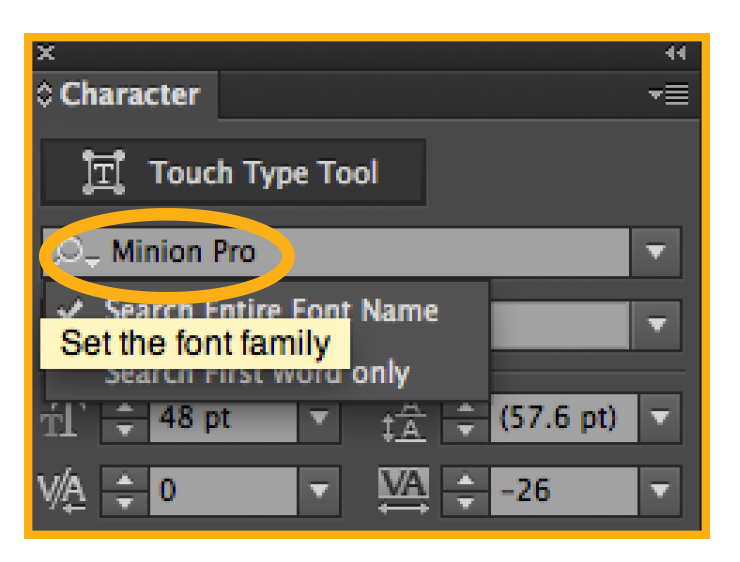
Font search
Find the perfect font — fast. In the Character panel, type a style such as “bold” or “italic,” a font family, or any other part of a font name. You’ll get a filtered view that lets you see just the fonts that match your criteria.
Set the font search:
- Search Entire font Name.
OR
- Search First Word only.
Typekit Desktop for fonts
Adobe Typekit® Desktop — part of Creative Cloud — will change the way you work with type. Quickly find the perfect font and have it immediately available in Illustrator.

TRANSFORMATION
On-art Free Transform
Get hands-on with the power of the Free Transform tool. Move, scale, and rotate objects directly using a touchscreen device.
Or use a mouse or other pointer right on the artboard to
transform objects in a more immediate and intuitive way.
Or use a mouse or other pointer right on the artboard to
transform objects in a more immediate and intuitive way.
Select the object and do the following:
- Constrain
- Free Transform
- Perspective Distort
- Free Distort
WORKING WITH BRUSHES
Images in brushes
Paint with a brush made from a photo. Art, Pattern, and Scatter brushes can contain raster images, so you can create complex organic designs quickly — with simple brush strokes. As with all Illustrator brushes, your strokes can be reshaped and modified at will. Make sure you stay true to the size since the brush is pixel-based. Capture a bigger size.
Use higher resolution to get a better result.
Use higher resolution to get a better result.
To create a brush from an image do the following:
- Place any rasted-based image.
- If it is linked, embed the image.
- Select the image and drag it to the Brush panel.
- Create an Art brush or a Scatter brush.
- Explore size and variations.
- Do not make it bigger than the original.(Avoid pixelation).
- Colorization methods will not work.


Auto Corners for Pattern brushes
Get the corners you want without extra steps. Create pattern brushes swiftly with auto-generated corners that perfectly match the rest of the stroke. No need to tediously create special corners for your sharp angles.
To create the Pattern brush do the following:
Select an image and drag it to the Swatch panel to create a pattern.
From the Brush panel create and new Pattern brush.
Apply the brush to an object and check the following:
- Turn on the preview
- Click on the first box to show the Auto Centered Corner Tiles and choose from the following options:
- Auto-Centered.
- Auto-Between.
- Auto-Sliced.
- Auto-Overlap

As a result you can double click on the Pattern in the swatch panel
and create a Pattern from a Raster-based image.
and create a Pattern from a Raster-based image.

WORKING WITH IMAGES
Multiple-file place
Import multiple files into your Illustrator layout at the same time and with new control. Now you can define the location and scale of your files — images, graphics, and text — and use new thumbnail
views to see where each file will go and how big it will be.
views to see where each file will go and how big it will be.
To cycle through the images click on the arrow keys on the keyboard to view the images. This will improve the workflow
and make placing images a different experience.
and make placing images a different experience.

Unembed images
Easily unembed images that have been placed and embedded in an
Illustrator file. You can quickly make images available for editing or extract files embedded in artwork you received from someone else. Links to the image files are created automatically. Simply choose unembed from the Links panel or from the Control panel to link the image.
Illustrator file. You can quickly make images available for editing or extract files embedded in artwork you received from someone else. Links to the image files are created automatically. Simply choose unembed from the Links panel or from the Control panel to link the image.
Expanded Links panel options
Get more complete information about any placed file in the Links panel. All of your placed elements — images, graphics, and text — appear in the Links panel, where you can track them with greater control than ever before.

Kuler for color syncing
Capture color themes out in the world with the Adobe Kuler® iPhone app. Share your themes and explore thousands of others available on the Kuler website. Sync your favorite themes, and they’ll be accessible immediately in Illustrator. Now Kuler is part of Illustrator panel.

File packaging
Probably one of the most requested features. File packaging automatically gathers and saves the
necessary fonts, linked graphics, and a package report into a single folder. Efficiently hand off
Illustrator files to production or keep your working files organized by packaging up your project.
necessary fonts, linked graphics, and a package report into a single folder. Efficiently hand off
Illustrator files to production or keep your working files organized by packaging up your project.
To Package a file:
- Save the current file.
- File>Package
- Check the elements needed for packaging
- Click OK to view the package.
You will see a folder and inside the report, links, file and font folder.

CSS Extraction
Hand-coding web elements such as icons and patterns can be frustrating. Now, create websites faster by letting Illustrator generate CSS code for you, even for a complete logo that includes gradients. Copy and paste the code right into your web editor.
The CSS properties panel is part of the application.


