
Using Opacity Mask in Type or in any shapes and images in Illustrator makes it - more interesting.
We will start with Type. Choose a bold type face.
(I chose Arial Black - I usually use Impact for Demo but I decided this time to change...).

I Selected the type & chose a color from the swatch Panel.
While it is still selected I duplicated the type and selected the top Path.
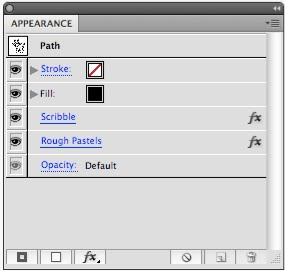
I am using 4 panels: Layers, Appearance, Opacity-Transparency & Swatch Panels.

Change the bottom Type to a different color. Select the top Path:
go to the fly-out menu on the Opacity Panel and click on: Make Opacity MASK.

The Layer Panel will change to Opacity Mask as well.
Activate Opacity Mask:
Draw a rectangle and choose a color.
Go to the Appearance Panel: Effect: Stylize: Scribble. I choose Snarl.
(Once again I was wondering who gives these names?
I would like to join the naming committee,or drink what they were drinking
while they were naming some of the commands;
Snarl, Pucker & Bloat...Just to name a few).

Since the Opacity Mask works with Black and White.
The shape or the image in the Opacity Mask will reveal or Conceal the image below.
In our case - my bottom type was orange. My Rectangle was black with a Snarl effect on it.


We will start with Type. Choose a bold type face.
(I chose Arial Black - I usually use Impact for Demo but I decided this time to change...).

I Selected the type & chose a color from the swatch Panel.
While it is still selected I duplicated the type and selected the top Path.
I am using 4 panels: Layers, Appearance, Opacity-Transparency & Swatch Panels.

go to the fly-out menu on the Opacity Panel and click on: Make Opacity MASK.

The Layer Panel will change to Opacity Mask as well.
Activate Opacity Mask:
Draw a rectangle and choose a color.
Go to the Appearance Panel: Effect: Stylize: Scribble. I choose Snarl.
(Once again I was wondering who gives these names?
I would like to join the naming committee,or drink what they were drinking
while they were naming some of the commands;
Snarl, Pucker & Bloat...Just to name a few).

The shape or the image in the Opacity Mask will reveal or Conceal the image below.
In our case - my bottom type was orange. My Rectangle was black with a Snarl effect on it.

In the image above you can see the Snarl Effect that is in the Opacity Mask.
(To see the image/Object in the Opacity Mask hold down the Option/Alt key
and click on the Opacity Mask.
To Reveal it Hold Down the Shift Key to turn off the mask).
Here is the Result:

The Black will reveal the color below and create a special textured effect.
Using the Appearance Panel you can change the effect by clicking on it and get a different look.
You can add an effect as well.
I changed the Bottom type color and the top Mask Color. Added another Effect.

Adding A Zig Zag Effect and a stroke.

Here is another Example
using an image in the Opacity Mask
I opened a Photoshop File - Selected it and copied it directly into the Opacity Mask.
The result is a vintage looking background in Illustrator ready to be used for anything you desire.
I created a rectangle. Filled it with dark brown. Found a vintage looking image on the internet.
Cropped it in Photoshop and copied it directly to the Opacity Mask of the rectangle.

This is the image inside the Opacity Mask.
Here is the Result:

You can add Brushes, Textures, Pattern. EXPLORE!!!!


