
In this sample I am using stars, circles and lines.
You can use any shape desired to achieve the look you want to get.
1. With the Ellipse tool selected, create a perfect circle (best to draw from center: hold down the option/alt and shift key). From the view menu bar: guides: make guides. Lock the guide.
 |
| Guide from an object (you can make a guide from any object in Illustrator) |
With the Rotate tool selected (from the tool box) hold down the Option/alt key and click
on the center of the guide. 36° and click copy. Make sure your preview is on!
3. Once one star is copied, go to the Object menu bar: Transform: Transform again (command/Control D). Repeat to create a complete circle of stars.
 |
| Stars around the guide |
 |
| Circle of stars |
 |
| Lines rotated in 36° |
With the Circle selected, choose the Scale tool from the tool box to scale the group of the small
circles to the center of the guide, and use the Transform again command to scale the group of the small circle to the center of the guide 80% each time.

6. Go to the View menu: Guides: hide or clear guides.
 |
| Final shape |
8. In Photoshop: Create a new document 72 DPI. White Background. Edit menu bar: Paste (command/Control V) Select the Path in the dialog box.
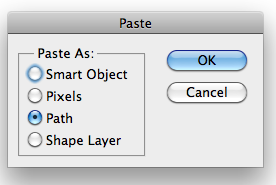
9. the path is loaded to the selected Background. In the path Panel save the path.
(give it a name in case you want to bring another path to the same file -only one work path per file)
 |
| Path from Illustrator |
Make sure that the path is loaded to the new layer. With the brush tool selected choose a brush
stroke the path. (Best to choose first the brush and than go to the stroke path command) .
stroke the path. (Best to choose first the brush and than go to the stroke path command)
Make sure the foreground color is black: Select the Path with the path selection tool.
11. Select the outer Stars and play with the Brush size to stoke it. Select the rest of the shapes and
12. Load the selection of the stroked layer (Select load Selection or Command/Control Click on
the layer thumbnail to load the selection. Edit: Define Brush Preset and give it name.
Go to Path: Stroke Selection. Experiment with the brush size.
 |
| Brush size, stroke path command |
stroke it with a smaller brush size.
 |
| Path is stroked with 2 or 3 different sizes of brush |
the layer thumbnail to load the selection. Edit: Define Brush Preset and give it name.
 |
| Saving the brush |
13. Now the fun begins! Create a new layer and start testing the brush you created!
 |
| Drawing with the new brush |
14. Working on the brush variations. Changing the size on the spacing in the main brush dialog
box, finding the space and size needed for the design.
 |
| Spacing preview
15. Changing the Shape Dynamic controls, playing with the direction of the brush - make sure
you see the preview of the brush. Choose a color for the Foreground and Background.
In the Brush control - adjust the color dynamic controls. Work with the saturation and
the brightness Jitter. You can introduce more colors to the brush if you change the amount
of the Hue slider. Play with the Purity slider to achieve pure colors or gray scale.
Explore!

16. With the brush tool, explore the brush strokes and the colors. Add effects to the brush.
Drop Shadow, Bevel and Emboss to create any metal look! (gold, copper, silver).
Adding different effects will effect the brush look as well. Save the brush preset.

Final Brushes! Keep playing and exploring!
   |